Algorithm for generating Mazes that are fun to play

Hey, everyone!

Recently we added Maze game in Puzzle Hub, and in this post I want to share the approach I took for generating mazes that are fun to play.

This is the second tech post on this blog. If you have any feedback or comments, please contact us on contact@puzzlehub.app. You can check out the first post here.

The goal

The goal was to write an algorithm that efficiently generates maze puzzles which are fun to play. But what mazes are fun to play?

Well, my theory is that the mazes which are fun to play have a nice balance between the length of the solution path (the path from the start to the end), the length of the corridors along the path (a corridor is a part of the path that is surrounded by 2 walls, meaning that you can go only forwards or backwards) and the number of intersections (the points on the path where you can go in at least 3 directions, meaning that you need to make a choice what direction you will take). Let’s explain more:

The length of the solution path is important because it measures how straightforward the solution is. If the path is too short, the solution is way too simple and probably can be solved just by moving greedily in the direction of the end point. If the path is too long, it covers too much of the maze’s area, which results in less space for the “wrong turns”.

The length of the corridors and the number of intersections are what can make or break a good maze, and they are connected with each other. If there are long corridors, there are fewer intersections – and vice versa. Long corridors make a puzzle boring because there are only few intersections at which you need to make a decision what direction to take, so you are mostly moving only forward between two walls. On the other hand, short corridors result in more intersections, but that makes the puzzle too easy because it’s too obvious for the human eye to see which turns are wrong when there are only 3-4 steps in that path. The key is to find a good balance.

Popular algorithms and why they didn’t work

There are many algorithms and resources for maze generation on the internet, however they are mostly basic graph algorithms that don’t take fun into account (and most are written for educational purposes). I tried few of them, but none consistently generated mazes that are fun by the standards listed above. Here is a quick summary:

  1. Depth First Search – too long corridors, boring and easy
  2. Kruskal’s or Prim’s algorithm – too short corridors, easy to solve
  3. Aldous-Broder algorithm – inefficient, puzzles not consistent
  4. Recursive division – didn’t try it, but don’t like the look of the mazes

If you want to read more about these algorithms, I highly recommend checking out this blog.

Depth first search approach

The depth first search algorithm works as follows:

  1. Choose random start position
  2. Set the start position as current and mark it as visited
  3. Randomize the list of neighbours of the current position
  4. For each unvisited neighbour in the list:
    1. Mark the neighbour as visited
    2. Remove the wall between the current position and the neighbour
    3. Set the neighbour as current position

Here is an animation of how this algorithm works in practice:

Notice how the algorithm creates very long corridors because it explores the grid in a depth first manner (thank you captain obvious). It just adds positions to the path as long as it doesn’t hit a wall. This results in boring, easy mazes.

Depth limited search approach

The approach that ended up to work best is based on the depth limited search algorithm. The idea is to fix the problem of DFS by limiting the grid exploration at certain depths. Basically, when we reach a certain depth, we stop exploring that path and enqueue the neighbours of the position where we stopped in a queue. Then we get the next element from the queue and continue with the same process from there. This is slightly different from the standard depth limited search algorithm because we don’t restart the search from the start when the depth limit is reached.

This can be written in two procedures:

DepthLimitedSearch:

  1. Create empty queue
  2. Add a random start position to the queue
  3. While the queue is not empty:
    1. Get start_position from the queue
    2. Run the DepthLimitedSearchRecursive(start_position, 0) procedure

DepthLimitedSearchRecursive(start_position, depth):

  1. Set the start position as current and mark it as visited
  2. Randomize the list of neighbours for the current position
  3. For each unvisited neighbour in the list:
    1. Mark the neighbour as visited
    2. Remove the wall between the current position and the neighbour
    3. If depth < depth_limit
      1. Set the neighbour as current position
      2. Run DepthLimitedSearchRecursive(neighbour, depth + 1)
    1. If depth >= depth_limit
      1. Add the neighbour to the queue

Here is an animation of how this algorithm works in practice:

Notice how when a corridor reaches a certain length, the exploration of that path stops and the algorithm continues from some of the queued positions which are always at a lower depth. By controlling the depth limit, we can control how short or long the corridors of the maze will be.

Choosing nice values for the depth limit

Now that we have some control over the length of the corridors (by adjusting the depth limit), we need to find nice values for it. The way I calculated those values was to create a program that generates 1000 puzzles for each depth limit value in the range of [5% of the grid size, 30% of the grid size]. For each of these depth limit values, the average corridor length and number of interactions was calculated from the generated 1000 puzzles. In the final algorithm, the depth limit is chosen randomly in the ranges that produce the best corridor lengths and number of intersections from the tests. Of course, this is also dependent on the grid size.
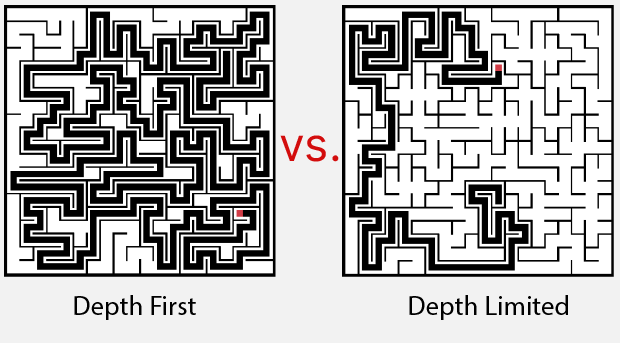
Comparison

The following image shows comparison between two solved mazes generated with both algorithms. Notice the long corridors generated from the depth first algorithm, versus the balanced nature of the depth limited approach (along with fine tuned parameters for the rest of the algorithm).

Conclusion

This blog post describes the approach used to generate mazes in Puzzle Hub. It uses a version of the depth limited search algorithm to control the maze’s corridor lengths, which results in mazes that are more fun to solve.

I hope that you found the post interesting. You can send any feedback or questions to contact@puzzlehub.app.

If you want to try the Maze game, download Puzzle Hub from the links below:

New game added: Maze (Update v1.1.9)

Hey, everybody!

Update v1.1.9 has been released!

The main addition in this update is a brand new puzzle game – Maze. Read more about Maze below. Another, smaller change is that the show frequency of the “Use hint if stuck” message has been reduced to once-every-24h. We got a lot of feedback that the message annoyed the players, so now that’s fixed. As always, there are some smaller improvements and fixes here and there.

Maze

Screenshot of Maze Level 3 (Easy)

Maze is the latest game added to Puzzle Hub. It’s the classic maze game where you are given a start (black square) and end (red square). The puzzle is solved when you find the path and connect the start and the end.

There are 4 difficulties available:

  1. Easy (15×15 mazes) – 100 levels
  2. Medium (20×20 mazes) – 200 levels
  3. Hard (30×30 mazes) – 200 levels
  4. Expert (40×40 mazes) – 200 levels

That’s 700 levels, along with endless amount of daily puzzles, waiting to be solved by you.

There are 2 input modes:

  1. Drag input mode – tap, hold and drag to continuously draw the line between the maze’s walls.
  2. Swipe input mode – swipe left/right/up/down to move the line’s head to the next intersection. This is the default and recommended mode to play.

Happy solving!

How to add sprites and prefabs in text in Unity (Text Mesh Pro)

While working on the hints feature in the Minesweeper game in Puzzle Hub, I felt that it would be really useful if the highlighted squares (in yellow and blue color) on the grid also appear in the hint message. This makes it easier to explain the hint with fewer words. You have probably seen something similar in many other games, for example when there is a coin next to a price in some text.

For a lot of use cases, you only need to add a sprite to the text, similar to how emojis work. However, in this specific use case, the sprite had to be a prefab. The first reason is that the highlighted squares can be in 5 different states. The second reason is that we support multiple color themes for the whole app. So I didn’t want to generate 5 static sprites for each supported color theme. Another reason why you might want to have a prefab instead of a sprite is if you want to have some kind of animation.

So, if you want to add a prefab that can be animated or scripted to a text, continue reading this post. If you want just a static sprite, try out this.

Tested on:
Unity 2020.3
– Text Mesh Pro 3.0.6

By the end of this tutorial, you will create a text with an animated coins icon like in this gif:

The final result

Step 1: Create a text and add a wildcard where you want the icon to appear

Start by creating a text element using Text Mesh Pro. Place a custom wildcard where you want the icon to appear. A wildcard is the part of the text where the prefab will be placed. In this example, I chose {c} as a wildcard for the coins icon. In the next steps, we will make this wildcard invisible and put the prefab in it’s place.

Step 2: Create a method

Let’s create a method in our code that will be responsible for replacing a wildcard with a specified prefab. I called the method ReplaceWildcardWithPrefab and it takes 3 arguments: a reference to the TextMeshProUGUI element, a string of the chosen wildcard, and a reference to the prefab we want to show.

public class PrefabInText : MonoBehaviour
{
    public TextMeshProUGUI Text;
    public GameObject CoinsPrefab;

    void Start()
    {
        ReplaceWildcardWithPrefab(Text, "{c}", CoinsPrefab);
    }

    public void ReplaceWildcardWithPrefab(TextMeshProUGUI text, string wildcard, GameObject prefab)
    {
        // The rest of the code will go here
    }
}

Step 3: Make the wildcard invisible using code

The first thing we do is to make the wildcard invisible by wrapping it in <color> tags. TMPro allows us to use tags to set the color of some substring of characters. To make a text invisible, we can use the color #fff0 (white with 0 alpha/opacity).

We can do that by adding the following code in our method:

var initialString = text.text;

// hide the wildcard by making it transparent
var hiddenWildcardString = initialString.Replace(wildcard, $"<color=#fff0>{wildcard}</color>");
Text.text = hiddenWildcardString;

Step 4: Find the center position of the wildcard

Before we instantiate the prefab, we need to calculate the position where it will go, which is the center of the wildcard.

The TextMeshProUGUI class has a textInfo property which contains the bottomLeft, bottomRight, topLeft and topRight positions of each character, among other useful things. To find the center of the wildcard, we get the bottomLeft position of the first character of the wildcard, and the topRight position of the last character of the wildcard and calculate the midpoint between them.

In code:

// get the index of the wildcard in the string
var wildcardStartIndex = initialString.IndexOf(wildcard);
var wildcardEndIndex = wildcardStartIndex + wildcard.Length - 1;

// get the positions of the first and last characters of the wildcard
var bottomLeftPos = text.textInfo.characterInfo[wildcardStartIndex].bottomLeft;
var topRightPos = text.textInfo.characterInfo[wildcardEndIndex].topRight;
var center = (bottomLeftPos + topRightPos) / 2f;

Step 5: Instantiate the prefab

Now that we have everything we need, we just instantiate the prefab:

// instantiate prefab
var prefabInstance = Instantiate(CoinsPrefab, text.transform);
// set the local position
prefabInstance.transform.localPosition = center;

Note that the calculated position is in the local space of the Text, that’s why the prefab is instantiated as a parent of the text and the local position is set.

The result

Step 6: Update the method to support multiple wildcards

At the moment, we instantiate only one wildcard. Without getting into details, here is how the method is modified to support prefabs of a same wildcard:

public void ReplaceWildcardWithPrefab(TextMeshProUGUI text, string wildcard, GameObject prefab)
{
    var initialString = text.text;

    // hide the wildcard by making it transparent
    var hiddenWildcardString = initialString.Replace(wildcard, $"<color=#fff0>{wildcard}</color>");
    Text.text = hiddenWildcardString;

    var lastIndex = 0;
    do
    {
        // get the index of the wildcard in the string
        var wildcardStartIndex = initialString.IndexOf(wildcard, lastIndex);
        if (wildcardStartIndex <= 0)
        {
            var wildcardEndIndex = wildcardStartIndex + wildcard.Length - 1;

            lastIndex = wildcardEndIndex;

            // get the positions of the first and last characters of the wildcard
            var bottomLeftPos = text.textInfo.characterInfo[wildcardStartIndex].bottomLeft;
            var topRightPos = text.textInfo.characterInfo[wildcardEndIndex].topRight;
            var center = (bottomLeftPos + topRightPos) / 2f;

            // instantiate prefab
            var prefabInstance = Instantiate(CoinsPrefab, text.transform);
            prefabInstance.transform.localPosition = center;
       }
       else
       {
           lastIndex = -1;
        }
   } while (lastIndex != -1);
}
Final result

I hope you will find this tutorial useful. If you have any questions or tutorial ideas related to Puzzle Hub, feel free to send a mail at contact@puzzlehub.app.

Welcome to our blog

Hello, reader.

We decided to setup a blog for Puzzle Hub. The plan is to write about the journey of developing the app, the technical challenges and interesting tips and strategies for the puzzle games.

Hope you will find it interesting.

Best regards,
Puzzle Hub team.